I bet you probably have hundreds if not thousands of photos in your iPhone’s photo album. I know I do. Within those vast numbers are photos that you love and may have even shared. And then there are others that you’re not so crazy about but decided to keep anyway. Do you struggle with finding photos when you want to share one or just enjoy looking at the special ones again?
The answer to making it easy to find photos in your iPhone library is to intentionally organize your photos inside of Albums or folders. Let’s look at how this works.
 Some Basics
There are a few things I want you to know before I take you through the steps for organizing within Albums.
First, If you have watched my videos for sharing photos, then you’ll be familiar with the upload icon that is always found in the bottom left corner of your photos app.
You also need to be aware that ALL of your photos and videos by default are stored in the “Recents” Album in the order that you took them or chronologically. This is important to know because If you decide to delete a photo from that Album only, it will be deleted altogether from your phone’s photo library and the iCloud library.
There are two other Albums that your iPhone library creates for you – People and Places. Just like the Recents Album, deleting photos from these removes them from your phone and your iCloud library.
Using Albums
Now for some good news about adding and deleting photos from Albums. You can actually add photos to any number of Albums that you have created personally. Then if you change your mind later, you can delete the photo from that Album and it will still be saved in your iCloud library. This only applies to Albums outside of Recents, People and Places.
Just to review:
- Deleting from the Recents, People and Places Albums takes the photo away forever, including the iCloud storage
- Deleting from any of the new Albums that you set up removes it there, but it remains in the Recents folder and your iCloud library

Choose Photos – Create a New Album
Here’s how to get started with Albums:
Step 1: In your photo library, tap “Select” and then choose the photos you want to group together in a new Album.
Step 2: Tap the upload icon.
Step 3: Scroll down to “Add to Album” and tap there.
Step 4: Name the Album, then tap Save.
Add More Photos to Album
Step 1: If you have the Album open and want to go back into the library and choose another one to add, tap the plus icon.
Step 2: On the next screen tap on the photo(s) you want to add and then tap “Done” at the top right.
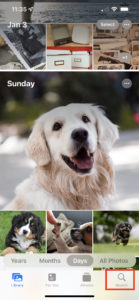 Using iPhone’s Search Tool to Get Organized
Did you know that your iPhone photo library has a very intuitive search tool? You can type in a generic term like “birthday” and it will scan through all your photos looking for something related to a birthday – like cake, birthday hats, etc. To use Search, look for the magnifying glass icon in the lower left corner of your screen.
Give the Search tool a try and explore how it can help you. You can choose to search by generic terms, months, years, location, and more.
Happy Organizing!
I hope these tips will help you begin to organize your vast library of iPhone photos. While you are at it, you might just take on some other housekeeping like deleting photos. I bet you have taken multiple photos of the same shot hoping to get the best one. Now don’t deny it! We all do it. Let’s just clean up the mess. Your phone’s operating system will thank you after you reduce the storage by multiple gigabytes.


0 Comments