If you are working towards getting your photos organized, then you already know that it’s not easy to find the photos that are stored here, there, and everywhere on your computer. We have an article and YouTube video that will help you if you are searching on a Mac. Let’s look at solving that same problem if you are using Windows on a PC.
 As you know, digital photos arrive on our computers generally with just numbers and letters as their file names. They look like this – IMG_2435. Or maybe a camera upload looks like this – 2009-05-16 22.50.34.JPG.
I’m sharing some tips on how to more quickly find a photo on your PC so that you can enjoy the confidence of knowing what is stored on your computer and where to actually find it. But first, let’s look at what data powers a successful search.
Metadata
Did you know that all of your digital photos are embedded with metadata? We have a video that explains more about this. You can watch it here.
Part of that stored metadata is the month, day, and year that you took the photo. If your photo was taken by a phone’s camera and your location settings were turned on, the metadata will also show where you took the photo. This data is going to be very valuable in helping you to find a photo quickly!
Where Photos Are Stored on a Windows PC
Depending on how your photos got onto your Windows PC in the first place, they are going to be stored in different places.
For example:
– Photos from a camera or your phone land in different places depending on your transfer method.
– Photos downloaded from your browser and the Internet will go to whatever location you have set your browser downloads to go to.
– A syncing cloud service like Dropbox, OneDrive and an iCloud account will store photos in their own synced folders.
Searching Using the Windows Photos App
 The Photos App in Windows 10 or later pulls together your photos from your computer, your phone, and other devices. It will then put them in one place where you can more easily find what you’re looking for.
The search capabilities in the Windows Photos App are pretty robust. To open up the Photos app:
Step 1: Use the Search Box on the taskbar.
Step 2: Type “Photos” and then select the Photos app from the results.
![]() Can’t find the Search Box on your taskbar? Click the Windows icon in the lower-left corner of your screen to launch the start menu and then scroll to find the Photos app listed in the left menu.
Can’t find the Search Box on your taskbar? Click the Windows icon in the lower-left corner of your screen to launch the start menu and then scroll to find the Photos app listed in the left menu.
Once you have landed in the Photos App, you should see a list of photos automatically arranged by date. Photos taken, saved, or downloaded recently should appear first, with older ones appearing further down the list.
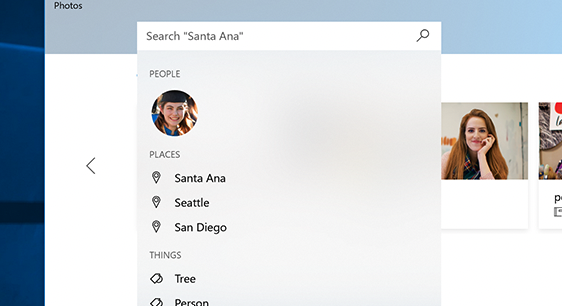
You can use the search box and keywords to search through your collection by date, album, people, or folder names. Or you can get more specific and search to find a person, place, or thing.
The remarkable Windows Photos App recognizes faces and objects in images and automatically adds tags that will help you find what you need! Its facial analysis algorithm is pretty amazing.

As you search for “mountains,” “dog,” or “tree,” it will pull photos that are recognizable for those search terms. Don’t expect a photo of a dog from far, far away or just a branch of a tree to be found unless you get lucky. But generally, this will really speed up your search. You can also select a face that is shown in the search pane to see all photos that this person appears in.
Searching for Photos Outside Windows Photos App
But what if the photo you’re looking for isn’t showing up in a search using the Photos App? Depending on where your photos originated before they came to your PC, they may be stored outside of the Photos App. In this case, you can get a head start on your search by using your computer’s File Explorer to find ALL the image files stored on your computer.
Step 1: Click the Windows icon in the lower-left corner of your screen to launch the start menu and then find “This PC.”
Step 2: Click on “This PC” and look for the Search Box to the right.

Step 3: Type kind:=picture and Windows will then gather all the photo files on your PC. Now you can scroll down through those to find that missing photo.

This type of search pulls image files of all types – JPEGs, PNGs, PDFs, GIFs, bitmap files (BMP), and others. If you find a photo that you want to open, your next step is to find the location of that file by right-clicking on it and then clicking Open File Location.
Searching Synced Cloud Services
If you have synced cloud services on your PC like OneDrive, Dropbox, or iCloud, the photo files in those folders can also be found using either the method described above or through a manual search.
Just remember that to open the files or to use them in a document, they have to be synced as “local” files.
Here’s how that works:
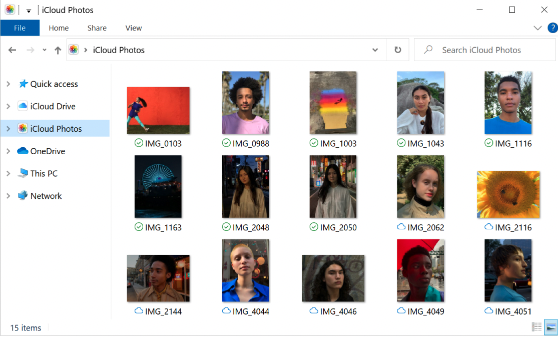
OneDrive – To save space on your computer’s hard drive, OneDrive files remain in On-Demand status until you open them for the first time. Your computer must be connected to the Internet at that time for the file to fully download and open. You’ll know when this has happened because the file thumbnail will have a green checkmark on it. So if you aren’t connected, the file won’t open and the thumbnail will show the cloud icon until you have downloaded and opened it.
 Dropbox – If you have chosen to have your Dropbox files remain in “online-only” status to save hard drive space, you’ll need to right-click and choose “Local” from the list of Dropbox options. You can always reset the file to “Online Only” status later to save storage space.
iCloud – Depending on which version of Windows you are using, your photos synced with iCloud may need to be clicked to download. You’ll know when they have been downloaded because they’ll have the green checkmark instead of the cloud on their file thumbnail.

Happy Photo Searching!
I hope this information has helped you to learn how to successfully search for photo files on your Windows PC.
Let me know in the comments what struggles you are having with using digital media to create a collection of your family photos and the stories that they tell.


0 Comments