Every time I watch the scenes unfolding on TV or on social media after a big storm, fire, or another natural disaster, it seems you hear the same thing from survivors.
“Well, we lost everything but at least we have each other. Things can be replaced but people can’t.”
Yes, so heartbreaking but true.
But these days, it seems more and more you also see another scenario unfolding. Survivors are walking through the ashes or the rubble of a destroyed home, and you might hear them say,
“We’re heartbroken to lose all our family photos. We’re hoping to find one that might still be here. But at least we still have some photos on our phones.”
Yes, also true. And a lightbulb moment for people who value family photos.
I know that everyone has a different opinion as to why the earth is growing warmer, but the hard truth is that it actually is doing so in tiny increments. But even these tiny changes are having an impact on the increasing frequency and severity of storms. Here’s an article from the American Museum of Natural History that explains the “how and why” of this phenomenon if you want to learn more.
To help us survive what seems to be this increasing frequency of natural disasters, we’ve bought renter’s or homeowner’s insurance. These are valuable tools to help us restart our lives after a disaster. But those policies and the financial help we get from them still can’t bring back the precious photographs and other paper memorabilia like recipes, kids’ school art projects, etc.
Thankfully, there is an insurance policy for those precious things. It’s called a Family Digital Collection.
Create Your Family Digital Collection
It’s going to take some time to scan photos and other memorabilia, so take heart! We just want to encourage you to create your own framework and begin to implement it. Then you can set aside time to work through the steps so that you’ll be prepared.
Step 1: Locate
 First, you need to find out where the family photos that you want to save to digital format are located in your home. You might even have some that are stored at a sibling’s home that you want to also protect. Do whatever works best for you, but for my brain’s comfort, I would temporarily put everything together in one room for now. It will make the next step easier.
Step 2: Inventory
Now it’s time to create a quick inventory of what you want to convert to digital format. Just write this down or type as you go so that it will help you with Step 3. Don’t go into too much detail. It can be as broad as:
- Photos from 1980 camping trip in the Smokes
- Great-Grandma’s pie recipes
- School photos for John and Mary
Step 3: Prioritize
Take what you wrote down in your Inventory and ask yourself this question – If disaster strikes in a few days, what are the most important things that I want to preserve the most? Prioritizing your digital conversion will keep you moving forward but also give you the peace of mind that you’ve taken care of the extra precious items first.
Step 4: Choose a Cloud Service
There are lots of cloud services available to you and I won’t go too deeply into this subject here. We’ll be releasing an article soon with a deep dive into choosing the right Cloud storage and will link it up here when it’s available. For now, here are a few of my suggestions and a quick overview.
- Dropbox. 2 GB of storage in their free account. Up to 1000 GB in paid plans. Check out their upgrades.
- Microsoft OneDrive. 5 GB free if you sign up on PC or Mac. Up to 1000 GB available to users of Microsoft 365 on PC or Mac. Check out all their plans.
- Google Drive. 15 GB storage for free if you have a Gmail account. Up to 10 TB available in paid plans. Compare those here.
Step 5: Choose a Secondary Backup
Cloud storage is great and certainly secure, but it’s also a good idea to add a second backup to an external drive. This backup could be stored with a family member in another city and you could offer to do the same in return for their digital collection storage. Not to be too morbid, but this a good plan if something happens to you and you have family members who don’t use cloud storage. They’ll have these memories from you anyway.
Step 6: Scan
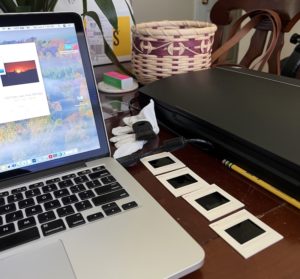 Using your priority list, this is the action step that will begin to ease your mind! Just start at the top of your list and work on scanning when you have some time. If you don’t have a flatbed scanner already and want to invest in one, you can usually find a pretty good quality one for less than $100 on Amazon.
You can also use an app on your smartphone. We found this great article that lists and reviews their 8 top recommendations. Some are free with in-app purchases for added features and others range from a $7.99 flat fee to a monthly subscription.
Step 7: Share cloud storage links & access
Don’t forget this important step. Make sure that you have set your cloud storage to be shared and then given those links and access to the important people in your life. Again, not to be too morbid, but none of us is guaranteed tomorrow. So once you have your cloud storage set up and just a few photos digitized there, go ahead and share with the people that you want to have access to your collection right now. Don’t wait until everything is scanned and ready. Just tell them it’s a work in progress!
Happy digital collection building! And may God protect you and your loved ones from the disastrous forces of nature.


0 Comments