If you are going on a trip or some other adventure soon with your friends, family, or co-workers, why not set up a system in advance to have one place where everyone can share their photos? We’ve created an article and video already that will help you set up a shared iPhone album. But what if some of your family or friends use Android phones? You’ll need to use another system.
I’d like to show you how to create a shared Google Photos album that you can share with anyone – no matter what operating system their phone uses.
Why Share A Photo Album?
Shared albums are just a great way to share and manage photos between friends or family. You can comment on each other’s photos and “like” your favorites. Those bits of data will stay with the photos when you add them to your own device, so you’ll have more memories from your trip or time together connected with the photos.
Getting Started with Google Photos Shared Albums
Here’s how to get started. If you don’t already have the Google Photos app running as your backup for your iCloud library, then you’ll need to install it.
To use Google Photos, you’ll need to be a Gmail user or have a free Google account already set up. Given all the free value that Google offers you from Gmail to Google docs, this is a good idea anyway. So set that up, and then you can get the app installed on your phone.
To get started, just go to the App Store on your iPhone or Google Play on your Android and search for Google Photos app. Download the app and right off you’ll be asked for access to all your photos, which you’ll need to allow. Next, you’ll be asked if you want to get notifications and that’s entirely up to you. Then you’ll be asked to sign in with your Google account info.
Set Up the Shared Album
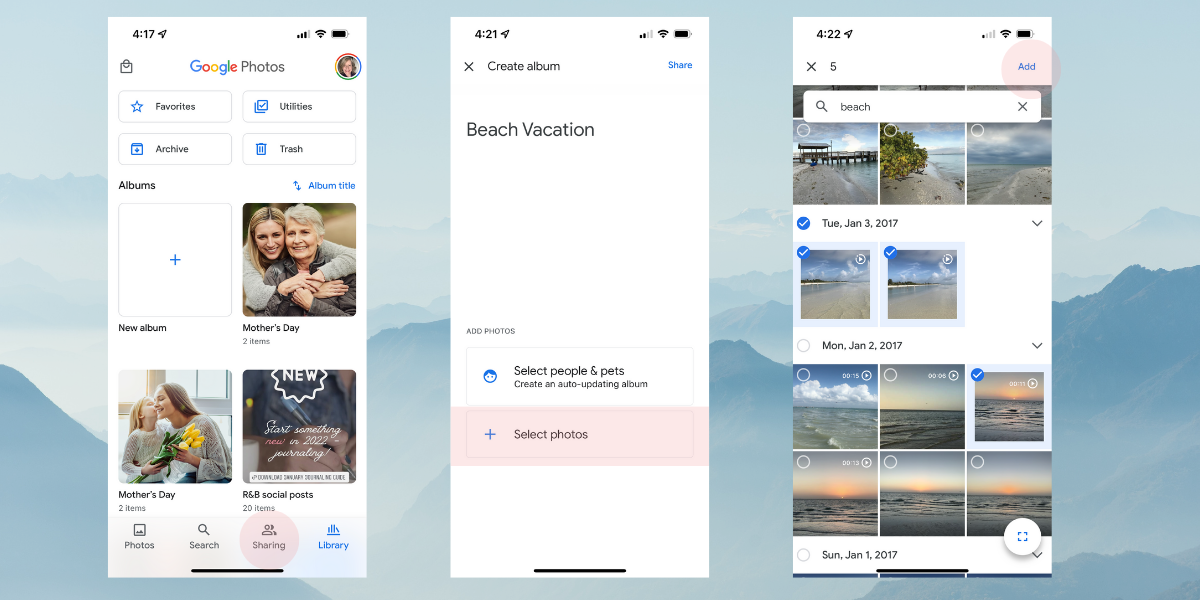
Now that you have the Google Photos app installed, tap on Sharing in the bottom task bar. On the next screen, tap Create Shared Album.
Give your new album a name and add some photos to get started. Tap on + Select Photos and then navigate to the photos that you want to share. This is where you can use Google’s excellent search feature if you need some help finding them. For example, I just typed in “beach” and I was taken right to the photos and videos that I wanted to share. Tap on Add up in the upper right corner and these are loaded into your shared album.

Send Out Your Invitations
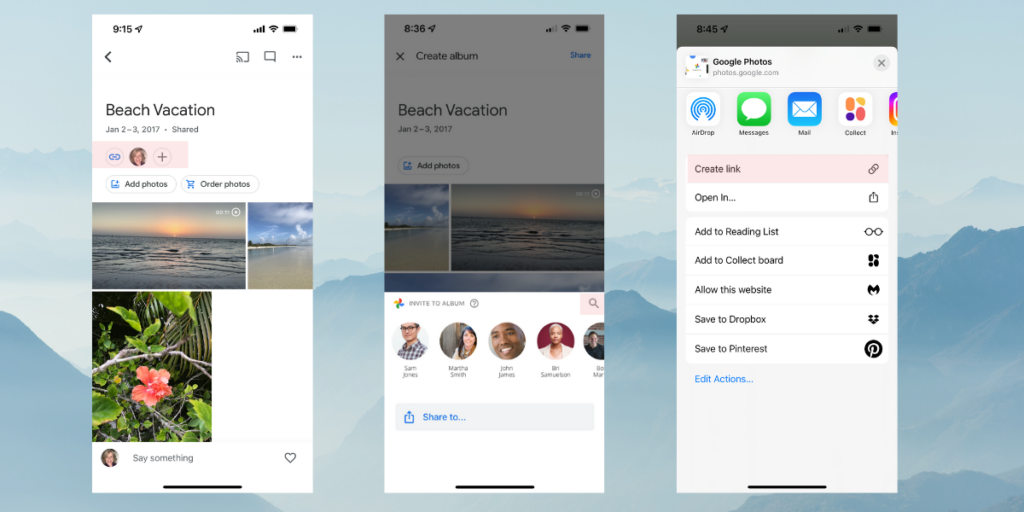
Now it’s time to invite people to share the album. There are several ways to get to the sharing options. If you’re just setting up your album, tap on Share in that top right corner. If you’re coming back later on, just open the album and tap on the + symbol next to the icons of yourself and others you have shared with already. The app will now show you some of your frequent contacts. You can share directly with anyone with a Google account if they are in your contacts. Or, you can search for them using their email address or phone number. Just tap on the magnifying glass icon for this option.
For everyone else, you can create a link to share. To create the link, tap on the box with the arrow pointing up where it says Share to… Tap on Create link and the link will be created and saved to your clipboard. Now you can paste it into an email or text message to send your invitation to share. If you need the link again, you can find it by opening the album. Tap on the link icon next to your profile icon to go to the album’s management page. Scroll down a little bit to find Link Sharing and a box to tap and copy the link.

Manage the Shared Album
Now that you’ve created your shared album and invited family or friends to join it you’ll need to know a little more about how to manage it. Open the shared album and tap on the three dots in the upper right corner to find the album’s management page. Tap on Options to see lots more ways to control how your album is used as well as a place to invite new people to share.
It’s good to know that you can keep your shared album in Google Photos as long as you want. Here are some tips, though, on how to manage the photos in the album.
Delete a Photo
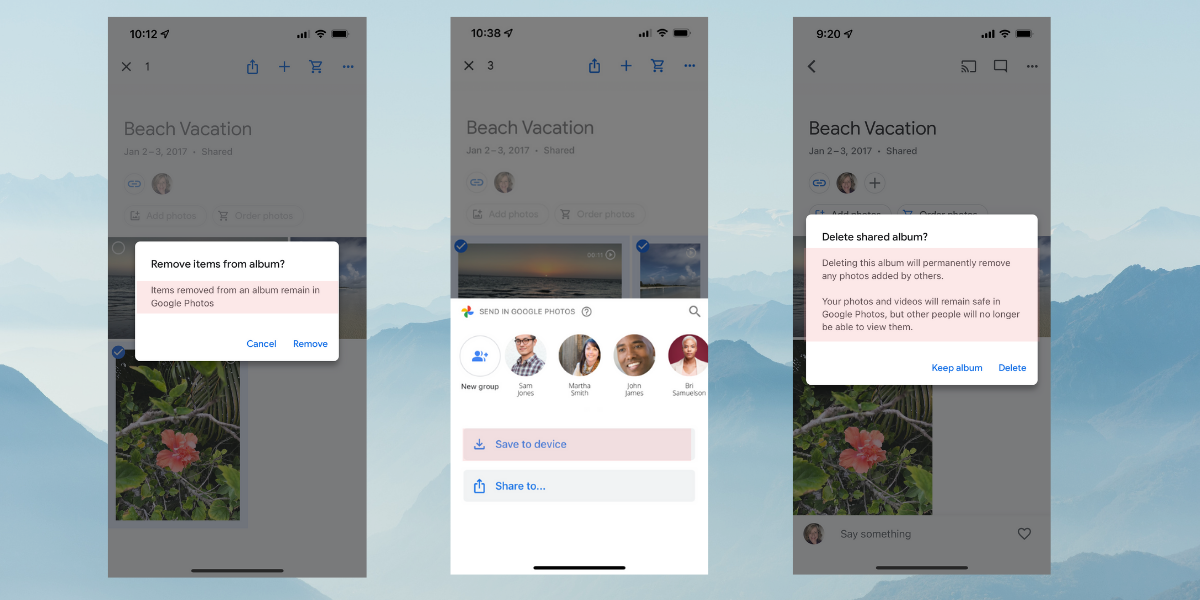
If you have shared a photo in the album and later decide you want to keep the photo in Google Photos BUT you want to take it out of the album, then tap on the photo and then the three dots in the upper right corner to open up that photo’s management options. Slide the options to the left to find Remove from album. Just tap there and the photo leaves the album but stays in your Google Photos app.
If you decide that you want to delete the photo from the album and the Google Photos app, be aware that if you do that, it will also automatically delete the photo from your iPhone Photo Library and from all of your other devices if you have synced your iPhone’s photo library with the Google Photos app.
If you accidentally delete a photo from Google Photos and you want to get it back, the app keeps deleted photos for up to 60 days in the Trash. You can restore it to your Google Photos account, but it doesn’t also restore to your iPhone photos library. To get it back there, you would have to use the “Save to device” option to get it back into that library.
When You’re Ready to Delete the Album
If you and your friends have decided that the album will be temporary, then you are going to want to save copies of your favorite photos that your friends have taken to your own device while the album is still active. You can do this by opening each photo or long-pressing on several photos and then tapping on the box with the upward arrow. Here you will see the option to Save to device. This places the photo(s) in your device’s photo library.
Even if the photographer who took the photo later removes it from the shared album or deletes it altogether from their device, if you have saved it to your phone’s library it will remain there. Make sure that everyone sharing the album with you knows about this, too.
When you are ready to remove the shared album, be aware that when you delete it then it will be removed from everyone’s devices. Your own photos will remain in your Google Photos library, but your friends will no longer have access to any that they had not saved.

Get Creative With Sharing
Did you know that there are other fun ways to use shared photo albums? Our family uses one for day-to-day photos that we want to enjoy privately and don’t want to put on social media. I’m always downloading my favorites to my own device’s photo library for future enjoyment. It’s wonderful to get the notification that a new photo has been added.
If you want to be notified when someone adds a photo to the shared album you created, you can manage those notifications in your device’s main Settings and Notifications. Just look for Google Photos and toggle the notifications on there.
If you’re thinking about creating a shared album but you’re not sure that you’ll be able to find the photos you have in mind, then check out our article and/or video where we share an easier way to search for photos on your iPhone.
Happy Photo Sharing
Let me know in the comments what struggles you are having with managing your photos, stories and more. If you’re already sharing photo albums, we’d love to hear from you, too, with any tips you might have for our community of story collectors.


0 Comments