We’re kicking off a new series in our Tech Support articles and videos that offers help for editing photos using the iPhone and Android photo editors. The first thing you’ll learn is how to straighten and crop your photos.
You probably already know that you can use your mobile phone’s camera to take photos of just about anything you need a record of. I’m always grabbing a photo of a product’s label so that I can be sure and find its replacement when I’m shopping. Sometimes I want to add that photo to another document and I just want to keep a clean image of the label or the recipe card or whatever I’ve captured. Let’s dive in to learn how to straighten and crop your images.
Getting Started
The steps given in this article are based on the iPhone’s iOS 15, so if you have problems following along, check your operating system to see if you need to upgrade. We have a video tutorial that can help you with that. Look inside the “Tech Support for Memorable Family Selfies” video or the companion article. The iOS update information is around the 00:49 mark in the video.
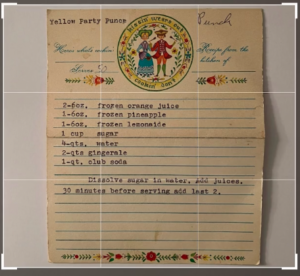
Another tip before we get started is that when you are photographing something that you plan to crop and add to a document, give yourself some editing grace by photographing it on top of a white background. I photographed this recipe for my mom’s “Yellow Party Punch” on some white foam board. After it is cropped if you have any leftover white space around the edges it won’t show if your document’s background is white.
 Straightening a Photo
The editing tools for your iPhone are available to you right after you take a photo as well as when you open a photo from your photo library. Go ahead and open a photo from your library and let’s look at how to straighten and then crop it.
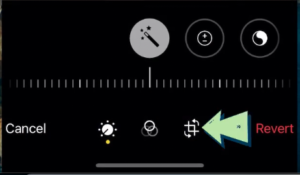
Tap on “Edit” at the top right of the screen to open the editing tools. To straighten the photo, tap on the crop/straighten icon in the bottom toolbar. Now you can press and slide your finger back and forth on the bar with the vertical lines to rotate your photo to the left and right.
When you are happy with how the photo looks, just tap “Done” and that will save the photo with this setting.
 Cropping a Photo
To crop the photo that you just straightened, tap “Edit” again to open up the editing tools. Tap on the crop/straighten icon again. This time you are going to press and move the box around the photo. Slide the edges of the 4 sides of the box near to where you want to crop until you have taken away all of the outside portions of the image that you want to remove. Tap “Done” and the image is saved.
Adding Cropped Image to a Document
Now that your image has been cropped you can add it to a document.
Step 1 – If you use Google Docs on your mobile device, open up Google Docs and tap the plus sign at the bottom right of the screen.
Step 2 – Choose “New Document.” Give your new doc a title and tap “Create.”
Step 3 – Tap the + sign in the top taskbar. This will give you the option to add various things.
Step 4 – Tap on “Image” and then “From photos” to open your photo library.
Step 5 – Tap on your cropped photo and then “Add” at the top right. This will place the cropped photo into your Google Doc.
Step 6 – To add a story related to your image, hit return a couple of times to move the cursor below the image.
Step 7 – Type or paste in your story text.
Step 8 – Tap the checkmark at the top left to save the document.
ADDITIONAL HELP
What editing tools do you need to learn?
As we roll out this series on editing photos, is there something you want to learn? Please comment below and let us know! Thanks for reading.


0 Comments